The floor under the stairs at the foyer was in dire need of renovation.
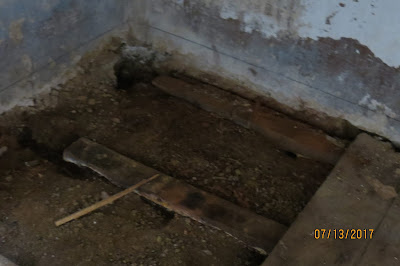
The area was covered mostly with wood planks sitting on wood joists. I say mostly, as there were large spaces where the wood had been removed and replaced with old lightweight cardboard. Needless to say, it stayed damp year-round and, yes, musty and smelly, too. A small area of cement was perhaps added after a major flood in the early '90s. That repair at least helped stabilize the base of the staircase.
This is the finish!
And now, photos of the starting point.
Here are a couple of the wood joists and planks from the original floor. The blue line on the wall was used to level the floor. All the wood had long since rotted and went directly to the "burn pile".
A thick layer of gravel was added around the existing cement area.
Notice the gravel stills sits well below the marked level line.
Water-bearer liner topped with a metal grid to reinforce the cement. And now it is time to add the cement.
This bucket held only half a sack of cement.
Total sacks = 40 Total buckets of cement = 80, hand-mixed, then leveled (screed) with a longboard, then troweled and brushed to create the tile's correct texture installation.
All's well, he still gives me the "thumbs up" signal! This is exhaustion.
Tight work area under the first few steps, several feet of work was done lying down.
One extremely long day of mixing and pouring cement, and it is time to rest over the weekend while it dries.
Plastering the walls is the next up on the agenda. Clean, patch, plaster then sand then clean and paint! Clearly easier said than done in tight quarters, and shall I even mention the dust! We had "downstairs shoes and upstairs shoes during this process," although little good it did.
We tried to create a barrier to limit the dust from the sanding process. We used several rolls of tape to make only a very slight difference. Lesson learned; you have to clean anyway.
Freshly plastered, sanded, and painted walls.
Now for the tile installation. Walls are ready and the floor is level just a matter of laying out the 18" tile in a grid.
Easier said than done, but why would this be any different than any of the previous rooms? Well, it wasn't impossible. Just needed some extra planning as not 1 of the 3 walls was straight or flat.
That cut around the curve of the step will be tricky.
A little encouragement never hurts. Millie lends her support.
And he does it!
Beautiful cut, and it fits perfectly. And now for the grout!
And done! We have found a lovely old sideboard for this space, and once in place, that crooked wall will never be noticed.
Aurevoir


No comments:
Post a Comment